
In order to take screenshots on your Windows 10 and Windows 11 computers, there are several methods you can imply.

Either to save the entire screen or just a piece of the image, we’ve rounded up all the best ways to take screenshots on your windows computers.
- To take screenshots on the Windows 10 and 11, you can use the Print Screen button or the Snipping Tool.
- You can also take screenshots using the Game Bar by pressing the Windows Key + G.
- Third-party apps offer even more features, like automatically uploading screenshots to the internet.
1. Pressing the Power + Volume Up
To take a screenshot on Windows 10 with Microsoft Surface device, press the Power Button + Volume Up Button. The screen will go dim, and your screenshot will save to Pictures inside the Screenshots folder.
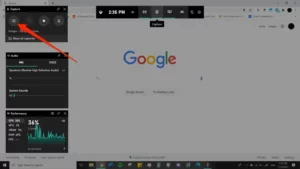
2. The Game Bar
The Game Bar is an overlay you can use inside most Windows apps and games to take screenshots and record videos. Below are steps on how to open and use it:
- By pressing the Windows Key + G.
- In the overlay menu, click on the Capture button – the camera icon – in the top menu brings up the Capture menu.
-
On the Capture menu, click on the camera icon to take a screenshot. This also gives you the ability to record a video clip by pressing the record button, including the option to include audio by clicking the microphone icon.
All screenshots and videos captured by the Game Bar are all saved up in PNG and MP4 format and you can find them in the Videos > Captures folder in File Explorer. You can also find them through the Game Bar’s Gallery, by clicking Show my captures > See my captures underneath the screenshot and recording buttons in the Capture menu.
3. The Alt + Print Screen
In order to only capture the active window you’re working in, press Alt + PrtScn. The screenshot would then be copied to your clipboard, and you’ll need to paste it into another program to save it.
4. The Print Screen button
The easiest way to take screenshots of your entire screen on Windows 10 and Windows 11 is by pressing the Print Screen (PrtScn) button on your keyboard.
The screenshot is then copied to your clipboard. To save the file, paste the screenshot into any program that allows you to insert images. Like Microsoft Word and the likes.
5. Third-party screenshot apps for Windows
In situations where you’re unsatisfied with the inbuilt Windows methods, there are third-party screenshot tools you can take into consideration. Each with its own extra offerings. Some of this tools include the following:
- Lightshot: This is a free screenshotting tool designed for quick social sharing. When you download and install Lightshot on Windows 10, it replaces the Print Screen function and offers more editing capabilities.
- Greenshot: This is another free tool that gives you the ability to edit and customize screenshots. You also have the option to capture a complete scrolling web page.
- Screenrec: is a free Windows recording tool that allows you to capture and share videos and screenshots. It also provides tools for annotating your recordings and screen grabs. You can as well instantly create a link that you can share with others so they can view them.